Bienvenidos
y gracias por pasar por mi blog!
Algo para
recordar: Lamentablemente en este momento no he podido viajar a Yucatán para
aprender a urdir las hamacas de los maestros. Sin embargo, lo que voy a
presentar aquí es todo lo que yo he aprendido personalmente por estudiar
múltiples videos de elaboración de hamacas. Sé que hay mucha variedad en cuanto
a los patrones del urdido, el tamaño de la hamaca, etcétera. Entonces mantén en
mente que todo lo que voy a presentar aquí puede variar de lo que hubieras visto
anteriormente. Claro, esto no quiere decir que soy maestro de hamacas, solo
quiero compartir mis experiencias personales con este arte sagrado.
Antes de
empezar, quiero dar mis gracias a Derek Hansen, en cuyo blog encontré la
información necesaria para poder empezar a urdir hamacas. Después de seguir sus
instrucciones estudié otros videos de urdidoras y urdidores para cambiar mi
estilo de urdir, y ese es el que quiero compartir contigo. Este blog
se va a dividir en partes ya que la elaboración de la hamaca para las fotos va
a tardar un poco, así que en esta primera parte del tutorial, solo voy a hablar
sobre la construcción del telar de hamacas.
Ahora si no
te atreves a construir un telar propio no pasa nada, porque hay otras maneras
de crear un “telar” para urdir las hamacas. De hecho, hice mis dos primeras hamacas usando dos palos de escoba con uno atado a un estante en mi armario, y el otro a una
distancia en el medio de mi habitación atado a un… realmente tengo ni idea de
lo que lo llamaría, pero era como algún tipo de cómoda hecha de alambre blanco.
Lo necesario es tener dos palos fuertes que no se curven bajo tensión, como los
mencionados palos de escoba, pero también sirven dos troncos rectos de bambú o
algo parecido. Hay que estar seguro de que los dos palos estén rectos y
paralelos para que la longitud de la hamaca se mantenga igual de un lado de la
hamaca al otro, y que los palos no se puedan mover mientras estás urdiendo.
Para esta primera
parte, consulta la página de Derek y fíjate en el diagrama que él muestra allí sobre
la construcción del telar de hamacas, porque allí él ya provee las dimensiones
adecuadas para hacer el telar, etc. : https://theultimatehang.com/2013/07/26/weaving-a-mayan-hammock/
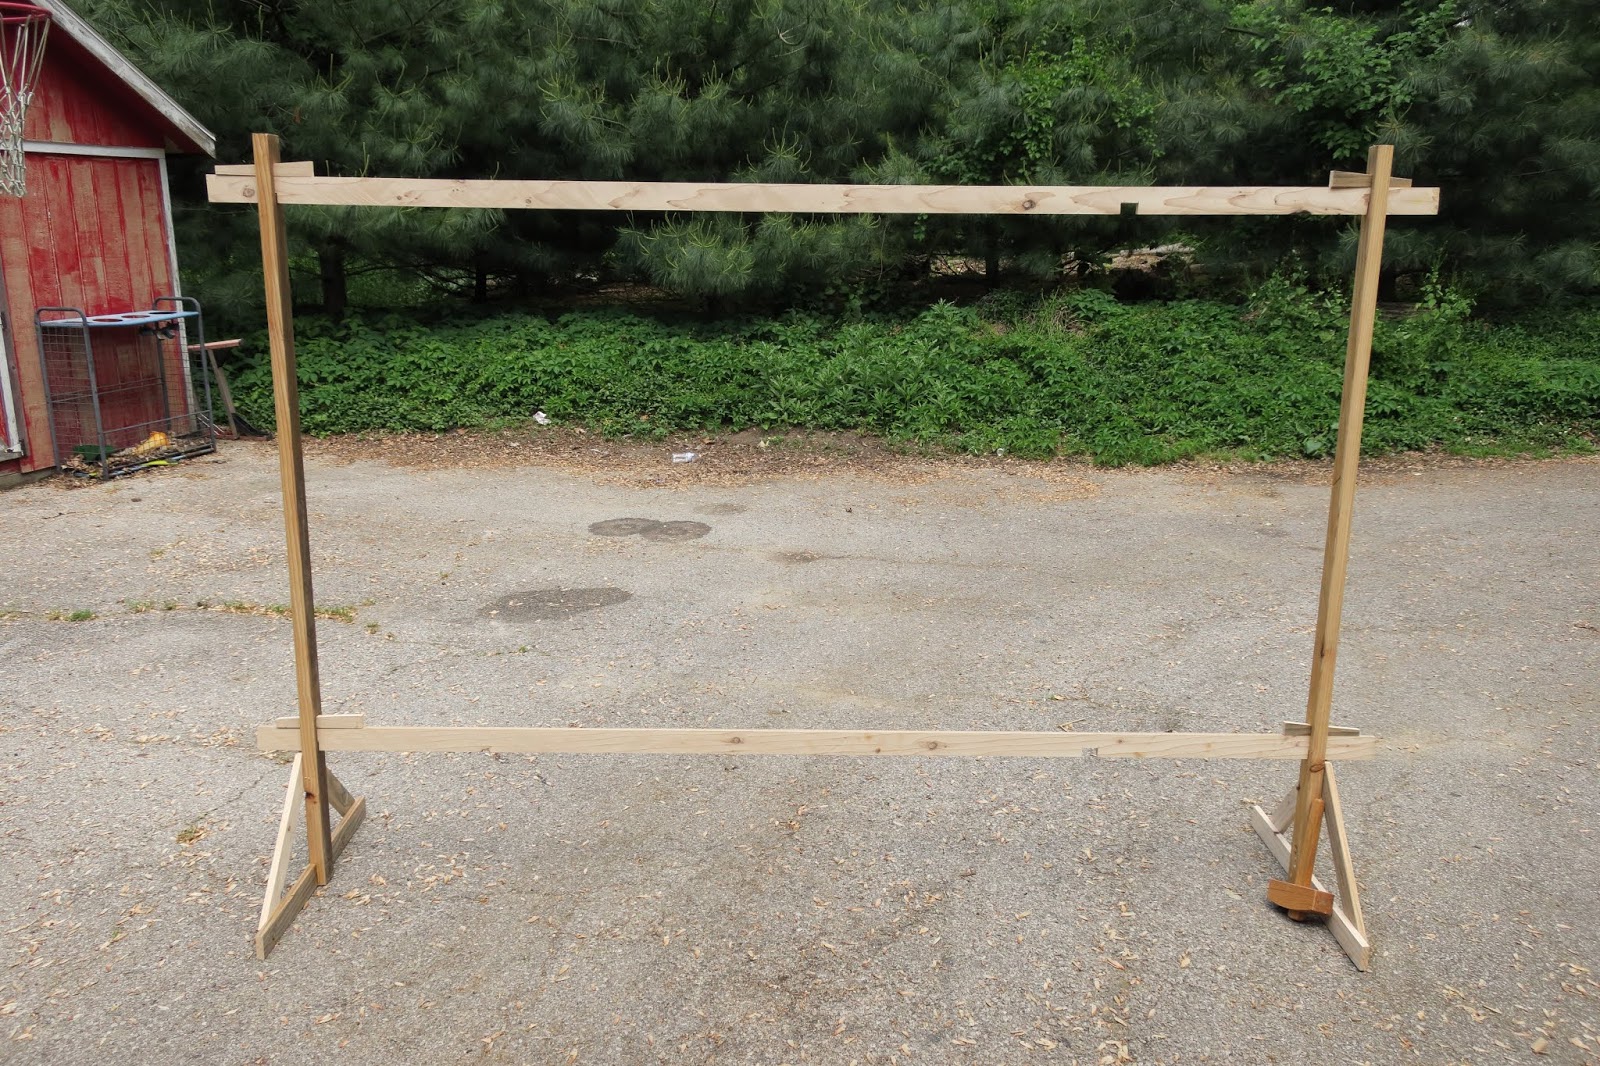
telar de hamacas
El diagramo
dado por Derek da una idea básica de cómo construir un telar y quiero ayudar a
la gente que no tenga experiencia trabajando con la madera ya que construir un
telar requiere dos o tres técnicas que van más allá de martillo y clavos.
La primera
de estas técnicas se llama una mortaja, que simplemente es un agujero
rectangular. Las mortajas se hacen en los soportes verticales y permiten que las
vigas horizontales puedan atravesarlos. Hay máquinas especializadas
para hacer mortajas, pero se pueden hacer igual de exitoso con solo un taladro
y un formón. Para empezar la mortaja, mide la altura de la viga horizontal y su
ancho. Realmente solo hace falta encontrar una broca que apenas tenga menos ancho que
la viga propia, y de ahí puedes hacer cuántos agujeros necesarios para abarcar la
otra medida de la viga.

En mi caso, necesité 3 agujeros
Después de taladrar
los agujeros necesarias para quitar la mayoría de la madera en esa zona, usa un formón y mazo para quitar la madera que queda, convirtiéndola en forma de
rectángulo. Es super importante no atravesar la madera completamente por un solo lado, sino de los dos para evitar que la madera se arranque por detrás creando un lío astillado en la superficie del telar que necesita estar lisa. Entonces cuando marcas los rectángulos, hazlo en los dos lados para que puedas taladrar en un lado hasta el medio, darle la vuelta a la madera y empezar desde el otro lado hasta que los dos agujeros se conecten por dentro, e igual cuando cortas con el formón.


No tiene que ser nada lindo :)
Se hacen
dos mortajas en cada soporte como el diagramo muestra, una cerca de la cumbre del
telar, y otro más o menos medio metro encima del suelo.
La segunda
“técnica,” que no es nada demasiado complicado realmente es como hacer las
ranuras en las vigas horizontales que las enganchan a las horizontales. Para
hacer este trabajo más fácil, marca el espesor del soporte vertical en tres zonas
de la viga horizontal para que el espacio entre las ranuras resulte 2m con otra
ranura a medio metro más allá de la original.

Para quitar
esta madera fácilmente, marca las tres zonas mencionadas y haz cortes
verticales como el diagrama siguiente muestra:

Luego para
quitar este rectángulo de un tirón, toma un formón que ocupa la mayoría del
espacio entre los cortes y, con una tabla apoyando la viga entera por detrás,
alinea el formón con la línea que queda y pega el mango con un mazo
manteniendo el formón perpendicular. Así solo la madera entre los cortes quebrará.
La última
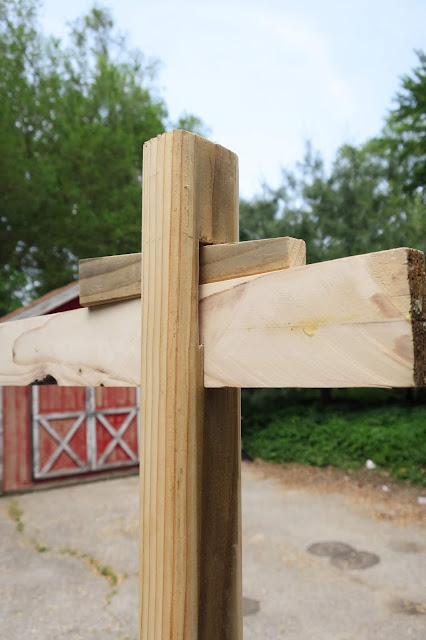
técnica que facilitará la construcción del telar se llama una junta solapada, que adjunta las partes perpendiculares en las patas del telar.
Primero marca las dimensiones de la pata perpendicular como indicado en estas fotos en rojo:


No pasa nada si los cortes no quedan perfectos, porque luego de cortar se usa un formón para allanar la junta y llevarla hasta sus dimensiones finales. Así que cuando cortas, asegúrate de cortar un poquito dentro de las líneas, dejando madera para quitar más precisamente luego con el formón - es la técnica para todo. Nunca hagas todo el trabajo con la sierra, deja un poquito para quitar con una herramienta más precisa luego (formón, papel de lijo, etc).

Después de allanar la junta, las dos piezas de madera se encajarán (casi) perfectamente:



Espero tener más información sobre la elaboración de la hamaca en las semanas que vienen, junto con la versión inglesa de esta y todas las demás partes.
¡Hasta pronto!

marca por el lado con la flecha roja

La otra dimensión para marcar
Ahora que todo está marcado usamos una sierra de mano para quitar esta porción superficial de la madera


Aquí una sierra de cortar al hilo es más apropiada

No pasa nada si los cortes no quedan perfectos, porque luego de cortar se usa un formón para allanar la junta y llevarla hasta sus dimensiones finales. Así que cuando cortas, asegúrate de cortar un poquito dentro de las líneas, dejando madera para quitar más precisamente luego con el formón - es la técnica para todo. Nunca hagas todo el trabajo con la sierra, deja un poquito para quitar con una herramienta más precisa luego (formón, papel de lijo, etc).

Después de allanar la junta, las dos piezas de madera se encajarán (casi) perfectamente:

Ahora solo hace falta centrar las dos piezas juntas y pegarlas con cola de carpintero:


Nos acercamos al fin del camino - no te preocupes. Para terminar el telar ahora solo hace falta cortar los 4 calzos como la foto de Derek muestra, y terminar las patas. Para terminar las patas, corta dos soportes diagonales que abarcan desde los extremos de la parte de abajo hasta justo debajo de la mortaja inferior, y mantén por lo menos 4-6 centímetros (que yo no hice al inicio, y tuve que corregirlo luego - pero no será posible arreglarlo en todos casos, entonces, cuidado) de espacio entre ellos.

los tres agujeros al fondo son errores míos, fíjate en la mortaja de arriba
Después de medir y cortar soportes adecuados, haz un corte de 45 grados en un extremo de las tablas y recolócalas para sujetarlas con clavos.


¿Ves ese espacio allí entre los dos soportes diagonales? Es más importante que los ángulos sean iguales que las piezas se toquen, por si la madera se mueva mientras estás clavando. Si queda madera bajo el extremo inferior, quítala con una sierra como yo hice con el lado derecho aquí.
Lo creas o no, ¡estás terminado! Lo último que queda para hacer es montar el telar e insertar los 4 calzos con un mazo para darle rigidez al telar.

Los calzos unen las partes del telar bajo presión.


Espero tener más información sobre la elaboración de la hamaca en las semanas que vienen, junto con la versión inglesa de esta y todas las demás partes.