Note: unfortunately in this moment I have yet to be able to
travel to Yucatán, México to learn how to weave hammocks from the Maya who
maintain this weaving tradition alive as their ancestors have done since
precolombian times. Although I haven’t had the chance to meet the masters, what
I am going to share with you here is a culmination of all of my own personal
hammock weaving experiences, and techniques learned from studying tourists’
videos of traditional hammock weaving which have produced very good results.
Before getting started, I want to give a huge shout out to
Derek Hansen, whose website theultimatehang.com is where I learned the basics
of hammock weaving from, which also has a plethora of general hammock wisdom to
get lost in for several hours. By following this link, you can view Derek’s
guide and videos, which will still be good to get acquainted with before
tackling a project of this size: http://theultimatehang.com/2013/07/26/weaving-a-mayan-hammock/
In this first post I will be supplementing Derek’s page with
more detail on how to construct the hammock loom which can be used to weave not
only Mayan hammocks, but also to weave more traditional western rope/spreader-bar
type hammocks as well, or any other type really. Go crazy with it. Don't make a loom that’s too flimsy because it may not hold up to the weight of a heavier rope as well.
Making a hammock loom isn’t very complicated, although there
are a few techniques used that go beyond regular hammer and nails that you might
not be acquainted with. And if after reading this first post you don’t feel up
to the challenge of building your own dedicated hammock loom, that’s fine! You
can make an improvised loom out of a pair of broom handles or bamboo poles tied
to 2 vertical, sturdy objects as anchors. In fact, I wove my first 2 hammocks with
a similar setup where I had one broom handle tied to a shelf in my closet with
the other tied to a sort of wire dresser thing in the middle of my room which I
then weighted down. But now having more experience weaving, having a proper
loom makes it much easier (and portable!), especially if you see yourself
making multiple hammocks. So long as you have 2 parallel broom handle-like poles
perpendicular with the ground that can’t move, they should be good to weave a
hammock on.
Note: if using your own sticks, try and use handles that have constant diameters from
one end to the other.
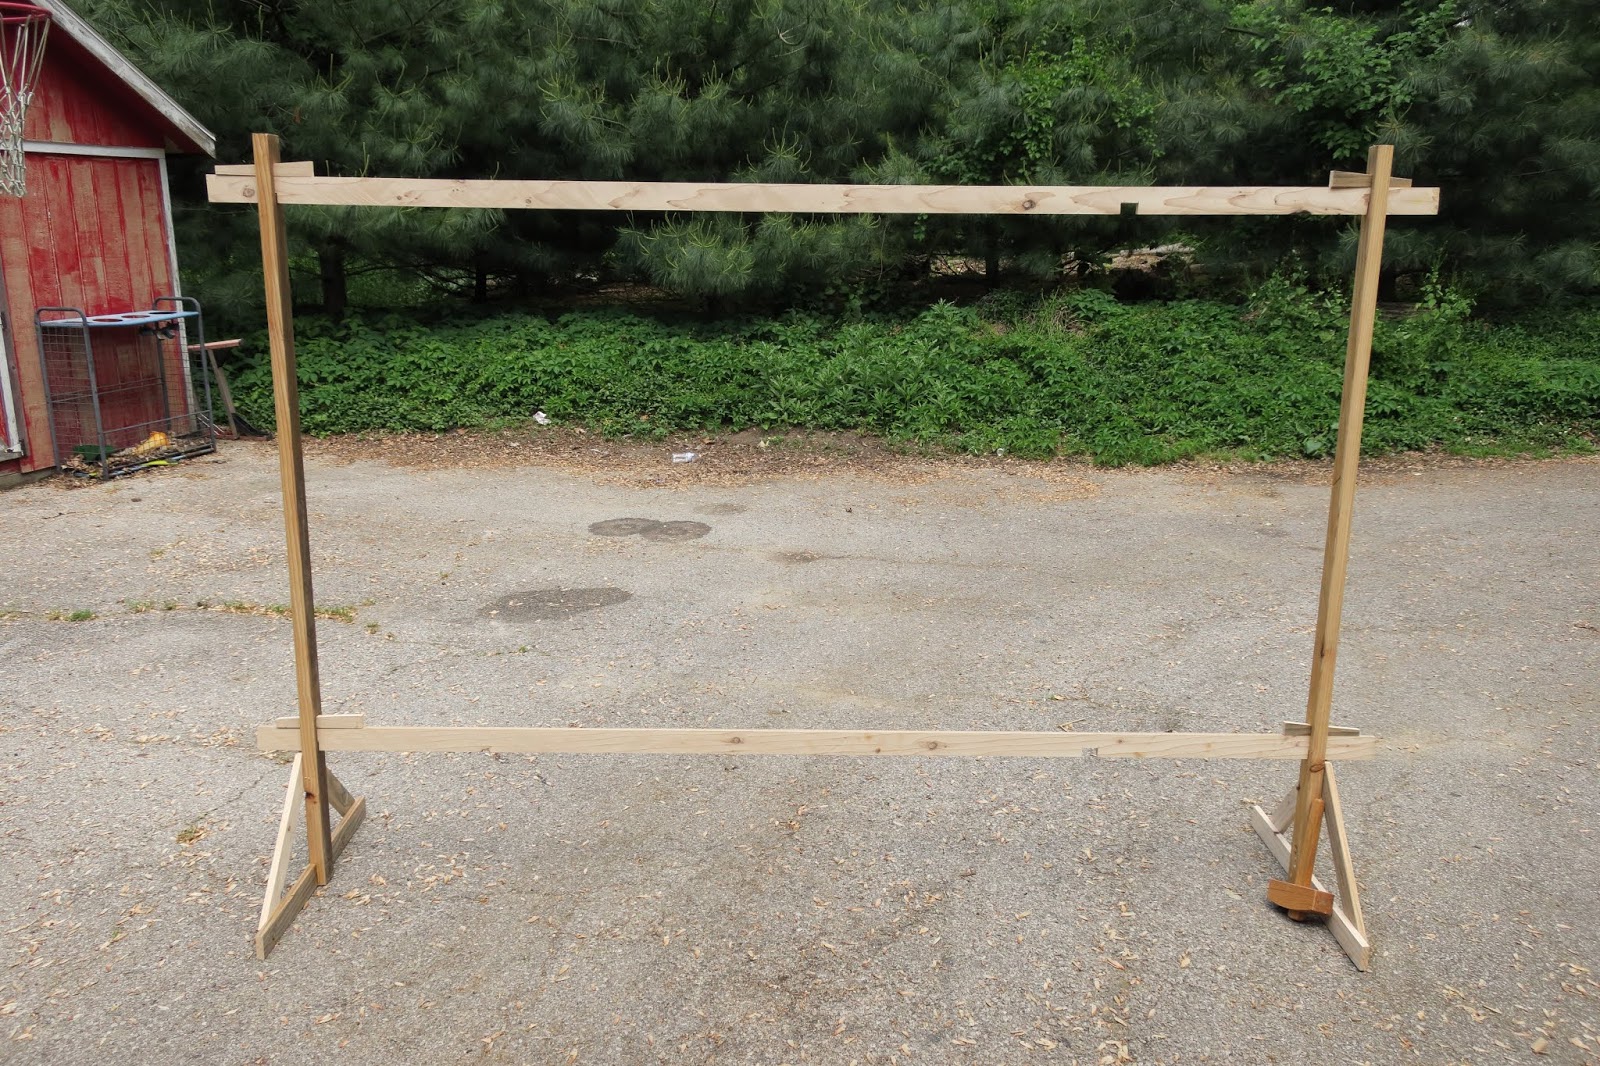
Completed hammock loom, roughly 6 feet tall with adjustable length for 2 different sized hammocks
Tools needed:
- hand saw
- drill with a bit approximately 3/4-1 inch depending on the dimensions of your lumber
- chisel
- wood glue
- clamps
- mallet
Optional tools:
- plane/spokeshave/drawknife
- miter saw
Anyways, on to the tutorial. First off I recommend some sort of pine for this project, since it's easier to work with and plenty sturdy for this project. I suggest you consult Derek’s
page and scroll down to the image of the diagram for the hammock loom, as you
can take your measurements from there and get a sense of how the loom is built
and assembled. As I mentioned earlier, making one of these looms will require 3
techniques that some might find difficulty with.
The first of these is called a mortise, pronounced like MORE-tis [ˈmoɹtɪs], which is just a rectangular hole. Mortising machines
do exist, so if you have any serious woodworking friends, they might be able to
help you. However, I prefer to do things the old fashioned way for now with
hand tools: a drill, chisel, and mallet.
To begin the actual work on the loom, cut the pieces (close)
to the dimensions given in Derek’s blog (or freestyle it!), and take aside the
two vertical end posts to cut mortises into, one in the top and bottom of each.
To cut the mortise, trace the dimensions of your transverse beam centered on the
vertical end post, one roughly 4 inches below the top, and the other approximately
1.5 feet from the bottom, on the front AND back of your piece. More on that
later.
One of the easiest ways to cut a mortise is to take a drill
with a wide bit and drill out the majority of the wood inside of your
rectangular area, then use a chisel to square up the corners, bring the hole to
its final size, shape, and to just clean the joint in general. I believe I used
a ¾ inch bit for mine, but you should use as big of a bit as you can without surpassing
the width of your markings. Did you remember to mark your wood on both sides?
That will be relevant now. When you’re drilling out the wood for the mortises,
it’s really important that you don’t drill all the way through the wood from
just one side, or else the wood will tear out on the back side, leaving you
with a splintered mess on what needs to be a smooth surface to avoid snagging
your yarns/twines. So, keep an eye on how deep you’re drilling and stop about
halfway, turn the piece over, and then the two holes will meet in the middle
and leave the surface clean. Same goes for chisels, work inwards from both sides.

Drill as many holes as you need to remove most of the wood

Then square it up with a chisel

It doesn't have to be anything pretty :)
The second “technique” isn’t so
much a technique as just a general tip for cutting the notches in the horizontal
transverse beams. To do this, mark the thickness of the end post on the thin
edge of your horizontal beam and extend those lines down about 1.5 inches or so,
roughly half the width of the piece. After marking a rectangular area like the
diagram shows, cut along the dotted lines and stop at the depth you marked.
Find a larger board to support the whole width of the horizontal beam from
behind before doing this next part, or tearout could rear its ugly head again.
Removing this little rectangle is as easy as lining up your chisel with that
bottom line and, holding it upright, give it a wallop with a mallet and it
should just pop off and not mess with any other part since we isolated it with
the saw already.

These notches should be measured and cut so you can weave a hammock with a bed of 2 meters, and an extended section to weave a longer hammock. I personally added a 2.5m extension to mine, as I like hammocks that are a little longer, but 3m isn't practical for most situations in my opinion.

Cut along the dotted lines and line your chisel up with the solid line on the bottom to cleanly break off the rectangle.
The final bit that I want to touch
on is how to cut a lap joint – a really basic way of joining 2 boards together
without the thickness of 2 boards. So to start out, the lap joint is going to
be cut at the bottom of the vertical posts where the triangular feet will
connect.
Lay the perpendicular piece of the foot
flush with the bottom of the vertical post and mark the dimension along the
side indicated by the red arrow:

Then, mark the other dimension of the
board like such:

This block outlined in red is what we’re going to be cutting
off. Any hand saw will be good for this, although having a rip saw handy will
make it easier to cut the wood along the grain.
While you’re cutting this block
off, always make sure to cut a little inside the lines so you can bring the
joint to its final dimensions with a chisel, which is much more precise and controllable
than a saw.

A crosscut saw will make the quickest work of cutting the wood in this direction.

Whereas a rip saw will cut more easily in this direction, but isn't necessary.

After the joint has been cut, use a
chisel to bring its depth to its final dimensions so when you put the horizontal
piece back, the two surfaces lie flush with each other.

Then you just need to glue it in
place with some sort of wood glue and clamp it to dry. But before that, make
sure to mark the centers of the joint and the horizontal part so everything is
centered and balanced.


Almost done, don’t worry 😊
Now we just need to cut and nail
the 2 diagonal supports for the feet on each side.

If you have a miter saw or
miter box that would be great, but if not you can make do with a protractor and
hand saw as long as you can get it close enough.

If you’re following Derek’s diagram
exactly, the dimensions of those pieces are provided too, however if you’re
just freestyling it how I did, these pieces should be long enough to reach from
the outer ends to a few inches below the bottom of the bottom mortise. I
didn’t leave that space at first and had to cut away wood from the diagonal
parts – luckily there weren’t any nails in the way. The extra space is needed
for when the horizontal beams fall into place and lower in their notches.

I had to cut off the top pointy bits by the bottom of this mortise because I nailed the diagonal bits too high.
So really just cut 45 degree angles
on one end of both of these slats and nail the two of them in place to complete
the isosceles triangle-shaped feet. That means if for some reason your angles
get off during nailing, like what happened to me, it’s more important for the
angles to mirror each other than to have the 45 degree ends touching each other
flush. If you have any extra wood sticking below the bottom of the horizontal
part, just cut it flush with a saw.
Now all that’s left to do is (optionally
round) and sand the horizontal beams and make the 4 wedges that will hold the
loom together. The rounder your horizontal beams are at this stage the better,
because if they’re left completely rectangular you’ll really only be receiving
friction from the sharp corners, which won’t hold the yarn in place as well and
could potentially wear on the yarn more. I personally ran a number 5 plane over
the corners to give them rounded edges with a flat back then sanded them smooth
and finished the wood with boiled linseed oil. If you happen to have any sort
of plane, spokeshave, or drawknife, those would be ideal for this type of work,
but even rough sandpaper can get the rounding job done to a good enough extent
to make a difference. As would some sort of power sander or Dremel.
Finishing
is optional for a project like this in my opinion, but feel free to use your
favorite wood finish on it if you want that added bit of protection.
After those things are done you can
finally assemble the loom! Put the horizontal pieces through the mortises on
the vertical bits and tap the wedges into place until they’re snug (not too
tight), then you’re done! Whenever you want/need to move the loom just do that
in reverse.

I'm not sure why, but I feel like it's better to drive the wedges in in this direction, with the thicker side on the inside of the loom.

This project is taking longer than
I had anticipated, however I hope to have the tutorials for the actual weaving
of the hammock written sometime this month (fingers crossed). Although I’m
going to write the Spanish version of the tutorial first, the visual aids will
probably be enough to get you started weaving.
So until then, take care!


